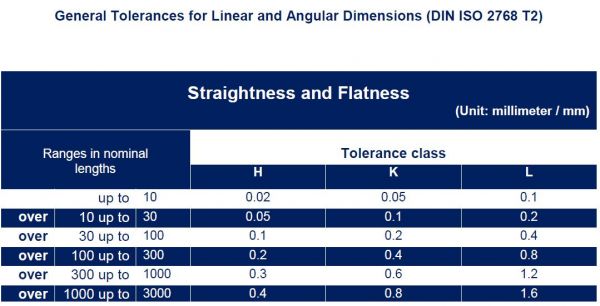
Material Dimension Tolerances
Dimension Tolerances for High-Hardness Material Industry
In high-hardness material industry, the accuracy to final dimension of green body is one of the most important features that determine production cost. Reducing dimensional tolerances is not possible without technological efforts.
In ceramic industry, methods of grinding, lapping, polishing and honing are different to metal industry, for example, the tools are mainly diamond wheels and chip production is very low.
Unless otherwise specified, the general tolerances for metals are DIN ISO 2768-m and for ceramic DIN ISO 40680.
Precision grades:
According to DIN ISO 40680
- Coarse (g) for tolerances that can be maintained by ceramic manufacturing techniques, for example, extruding and casting.
- Medium (m) for tolerances that can be maintained on small parts, for example extruding, dry pressing and isostatic pressing.
- Fine (f) for tolerances where the accuracy grades of Coarse and Medium are not sufficient.
The dimensional accuracy of sintered parts' size essentially depends on the material and the forming method. For this reason, tolerances are given according to DIN ISO 2768-m.
Standard tolerances:
Tubes, multi-bore tubes and rods:
- Cut length tolerance: ± 1 %, < 100 mm upon request;
- Straightness: maximum crescent height 0.5% of total length
ø ≥ 3 mm:
- Diameter ± 5 % (but not less than ± 0,1 mm);
ø < 3 mm:
- Diameter ± 5 % (but not less than ± 0,05 mm);
Crucibles, boats, combustion trays:
- Tolerances ± 3 % (but not less ± 0,1 mm)
Plates:
- Tolerances ± 3 % (but not less ± 0,1 mm);
- Deflection: maximum 0,5 % of the diagonal
Insulating beads and grinding bodies:
- Tolerances ± 3 % (but not less than ± 0,1 mm)
The information presented below is only for quick reference. To get accurate data, please contact us .


*Umicore is not responsible for the accuracy of the data above.


